If you’ve ever watched kids play with slime and secretly thought, “That looks kinda fun,” then get ready — because this version you can actually eat. Edible slime jars are colorful, gooey, stretchy, and totally safe to taste. They’re a party treat disguised as a sensory experiment, a recipe that’s half kitchen magic, half nostalgia. It’s messy, delightful, and surprisingly simple to make. You don’t need special ingredients or weird chemicals — just pantry staples and a bit of curiosity. Think of it as dessert meets science class, with a sweet twist that’ll make everyone grin.
Ever tried pulling a spoon through something that stretches like slime but tastes like frosting? That’s the joy of edible slime. It’s playful, textural, and creative. You can tint it, flavor it, swirl it, or layer it in jars for a dessert that looks like art. Kids go wild for it, but honestly, adults love it too. It’s the kind of recipe that makes you feel like a kid again — no rules, just colors, textures, and sticky-sweet fun.
Why It’s Special
There are recipes that you make to impress people, and then there are recipes you make just to have fun. This one is both. Edible slime jars are unique because they’re tactile and edible — a mix of food craft and dessert. You can build them in layers like parfaits or swirl them like galaxy slime. The base is smooth and glossy, with a chewy pull that’s oddly satisfying to stir and stretch. They’re made from simple edible ingredients like cornstarch, marshmallows, or condensed milk, depending on the version you go with.
They’re also customizable. You can make neon slime jars for a glow party, pastel ones for baby showers, or fruity versions for birthdays. Add edible glitter, candy pearls, or cookie crumbs for texture. And yes, they photograph beautifully — vibrant colors layered in glass jars that shimmer under the light. Whether you’re creating them for kids’ activities, party favors, or social media-worthy desserts, these jars bring out your playful side.
Ingredients & Substitutions
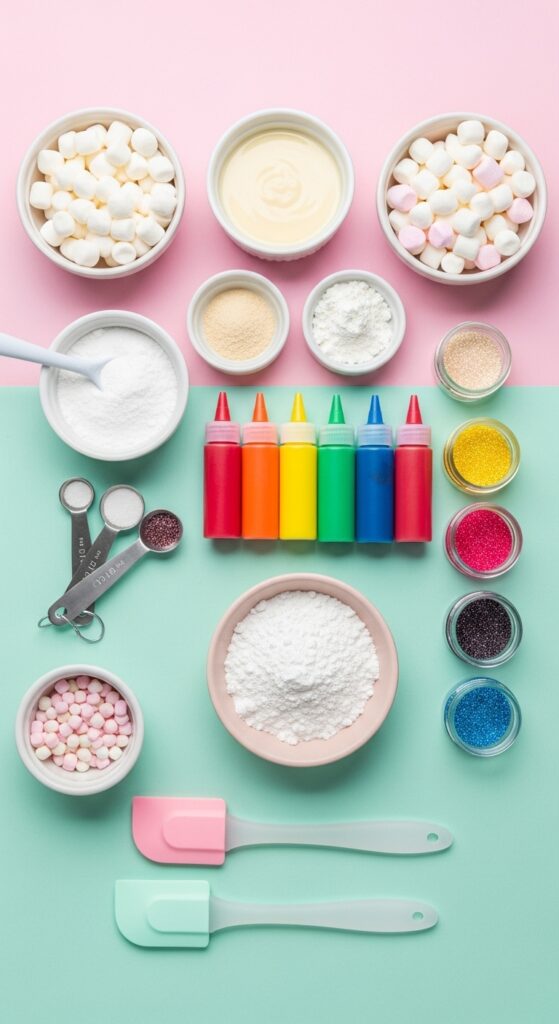
Base Ingredients
• Mini marshmallows – soft and sticky, the heart of your edible slime.
• Sweetened condensed milk – gives body and that silky texture.
• Cornstarch – helps thicken and stabilize the slime.
• Food coloring – gel or liquid, depending on the look you want.
• Powdered sugar – for dusting and adjusting stickiness.
Optional Add-Ins
• Vanilla extract or candy flavor oils – for taste variety.
• Edible glitter or luster dust – for sparkle.
• Crushed candy or sprinkles – for texture and decoration.
Substitutions
If you’re avoiding dairy, swap the condensed milk for coconut condensed milk or a dairy-free white chocolate ganache base. For a less-sweet version, try thickened cornstarch pudding mixed with clear corn syrup for the same glossy pull. Don’t have marshmallows? Melt white chocolate with a bit of light corn syrup for a stretchy, fudge-like texture that mimics slime.
Expert Tips
Always use heat-safe utensils when melting marshmallows or condensed milk. A silicone spatula works best since the slime is sticky. Avoid overcooking — heat gently, or you’ll lose that stretchy feel. Food gel colors give the most vibrant tones without thinning the mixture. And if it’s too sticky to handle, dust your hands with powdered sugar or cornstarch before shaping or layering.
Step-by-Step Instructions
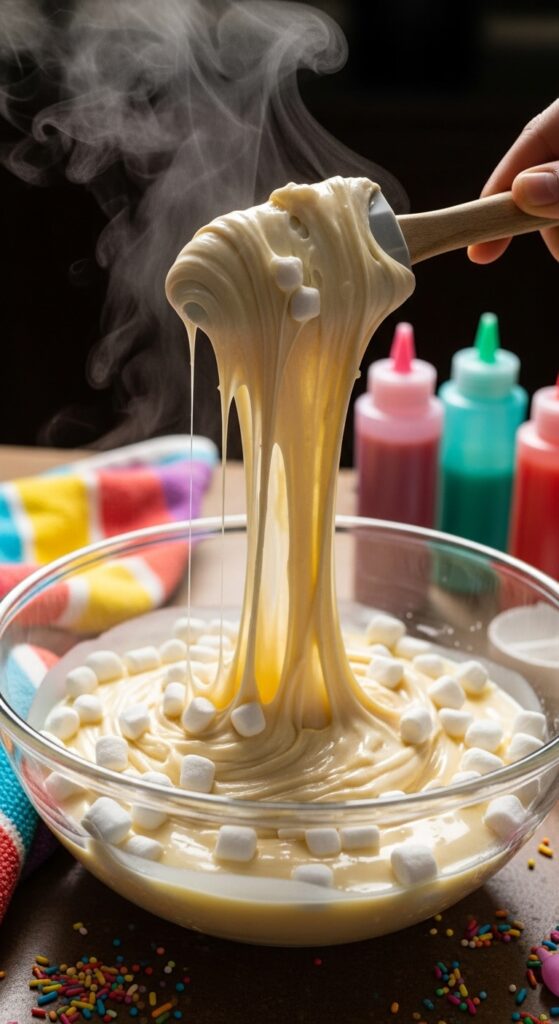
Start with your base — grab a microwave-safe bowl and pour in the mini marshmallows. Add one to two tablespoons of sweetened condensed milk. Heat in short bursts, about 15–20 seconds at a time, stirring in between until the marshmallows melt into a smooth paste. It’ll look glossy and elastic.
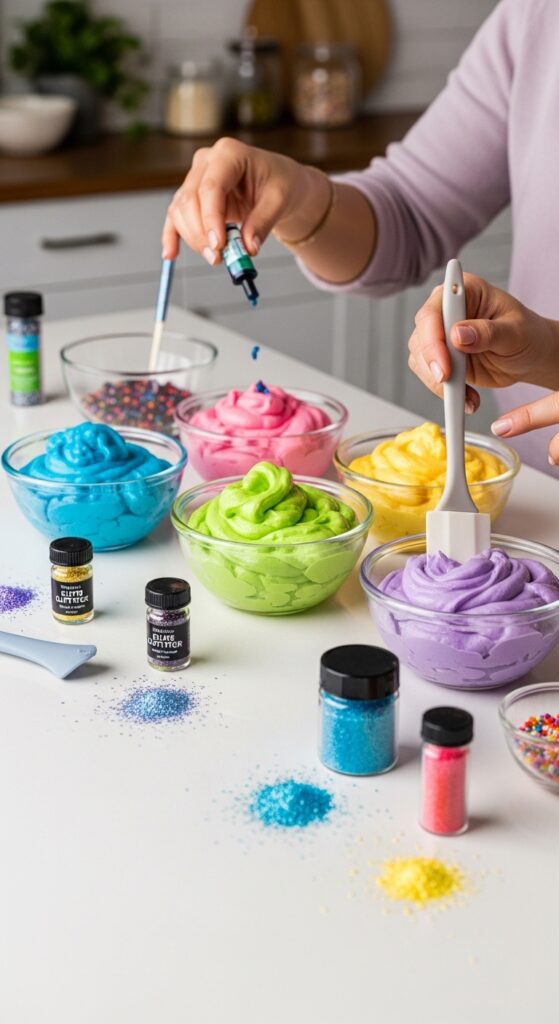
Now, sprinkle in a teaspoon of cornstarch. Stir again — the mix will thicken slightly. At this point, it’s time for color. Divide the batch if you want multiple shades, and add a few drops of food coloring to each. Stir quickly before it sets too much. You’ll start to see it transform — stretchy, shiny, and sweet-smelling, almost like candy taffy.
If the slime feels too thick, add a bit more condensed milk. Too thin? A dusting of powdered sugar or cornstarch brings it back. Once the consistency feels like warm putty, you can stretch it between your fingers — it should pull without breaking, smooth but slightly tacky.
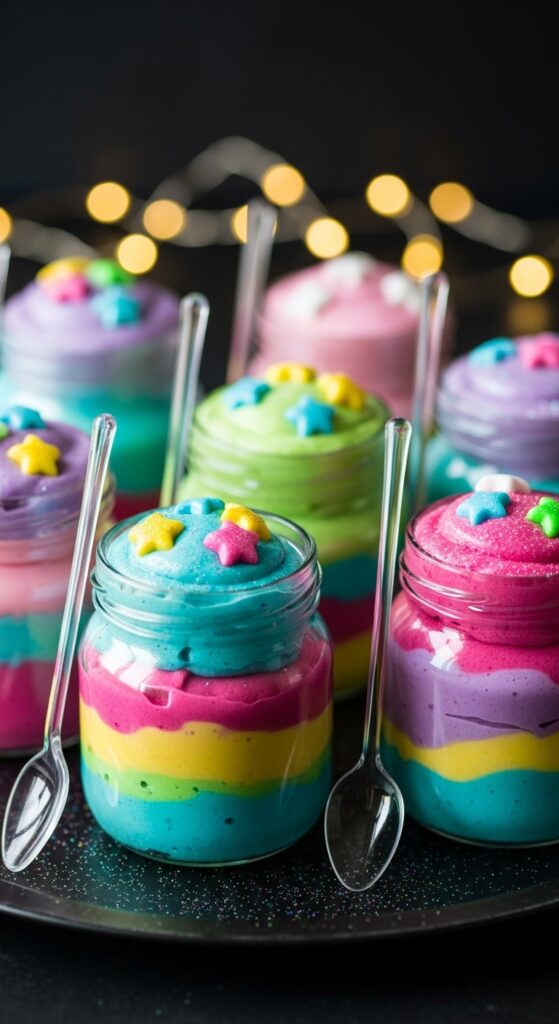
Now comes the fun part: layering. Grab clean glass jars or small plastic containers. Swirl or spoon different colors of slime into each jar, twisting as you go. Press lightly with the back of a spoon to create marbled patterns. For extra wow, sprinkle edible glitter or tiny candy stars between layers. Seal the jars or cover them loosely, then let them cool for a few minutes before serving or playing.
Common Mistakes to Avoid
Overheating is the biggest one — melted sugar hardens fast. Always melt slowly and stir often. Adding too much cornstarch can turn your slime crumbly instead of stretchy. And don’t refrigerate before it cools completely — condensation makes it sticky and wet.
Variations
Rainbow Slime Jars: Divide the base into six bowls, tint each with a different color, then swirl together in a clear jar for a rainbow effect.
Galaxy Slime: Use navy, purple, and black gel coloring with a sprinkle of edible glitter for a space-themed dessert.
Sour Slime: Mix a bit of citric acid powder or lemon extract into your base for a tangy twist that surprises the tongue.
Vegan Version: Use melted vegan marshmallows or a cornstarch-and-corn syrup mix with coconut milk instead of condensed milk.
Cooking Techniques & Science
The magic of edible slime lies in gelatinization and sugar elasticity. When you heat marshmallows or condensed milk, the sugars soften and stretch. The cornstarch stabilizes that texture by binding with the water content, creating a chewy, elastic mass. That’s what gives it its stretchy, pullable consistency.
It’s also a moisture balance act — too much liquid and it turns runny, too little and it cracks. That’s why condensed milk is so effective; its high sugar and protein content help maintain structure while keeping things edible and safe. The temperature sweet spot is around 180°F — just enough to melt without caramelizing.
For tools, silicone spatulas and heat-resistant bowls are non-negotiable. Glass jars make the final product look beautiful, and airtight lids help keep the slime from drying out. UV-reactive food coloring or glow-in-the-dark edible dust can even make your slime glow under blacklight, adding a playful twist for nighttime events.
Recipe Card
Ingredients
2 cups mini marshmallows
2 tbsp sweetened condensed milk
1 tsp cornstarch (plus more as needed)
Gel food coloring of choice
Powdered sugar (for dusting)
Optional: flavor extract, edible glitter, sprinkles
Instructions
- Add marshmallows and condensed milk to a microwave-safe bowl.
- Heat in 15–20 second bursts, stirring until melted and smooth.
- Stir in cornstarch and mix until thickened.
- Divide and color the slime with gel food coloring.
- Adjust texture with powdered sugar or extra condensed milk as needed.
- Spoon or swirl into jars, adding glitter or candy between layers.
- Let cool slightly before serving or handling.
Prep Time: 10 minutes
Cook Time: 5 minutes
Total Time: 15 minutes
Servings: 4 jars
Nutrition (per serving): ~180 calories, 2g fat, 36g sugar, 1g protein
Serving & Pairing Suggestions
Edible slime jars are best enjoyed as a novelty treat — they double as both snack and entertainment. Serve them in small glass jars with spoons or let guests “stretch and taste” as part of a dessert station. Kids love to mix their colors and create their own combinations, so a DIY slime bar works perfectly for parties.
You can pair edible slime with simple cookies, plain vanilla cake, or milkshakes to balance the sweetness. For adult-themed events, make boozy slime jars using a splash of flavored liqueur (just label them clearly, of course). For kids, add gummy candies or sour belts on top. The contrast of chewy slime and soft toppings makes every bite an adventure.
Presentation matters here — transparent jars, clear spoons, maybe a little LED light underneath to make them glow. Edible slime isn’t just food, it’s performance.
Conclusion
Edible slime jars might just be one of the most unexpectedly joyful recipes you’ll ever make. They’re easy, fast, and endlessly customizable. Whether you’re making them for a birthday bash, Halloween table, or just a rainy afternoon activity, they deliver both fun and flavor.
They teach you to play again in the kitchen. To mix, melt, swirl, and enjoy the messy magic of creation. You don’t have to be a pastry chef to pull this off — just bring curiosity and a sweet tooth. Remember: food doesn’t always have to be serious. Sometimes, it can stretch, sparkle, and make you laugh. That’s edible slime in a nutshell.
FAQs
1. Can I make edible slime ahead of time?
Yes, but store it in airtight jars at room temperature for up to 24 hours. Avoid refrigerating — it’ll stiffen and lose stretchiness.
2. Is edible slime safe for toddlers?
It’s made from food ingredients, so yes, but supervise closely since it’s sticky and could be a choking hazard in big chunks.
3. How can I make my slime less sticky?
Dust your hands with powdered sugar or cornstarch while mixing. Also, let it cool a bit — warm slime sticks more.
4. Can I color it naturally?
Absolutely. Beet powder, spirulina, or turmeric work for pink, green, and yellow tones, respectively.
5. Can I use regular milk instead of condensed milk?
No, it’s too thin. You need the thickness and sugar concentration of condensed milk to achieve that stretchy, glossy texture.
Edible slime jars aren’t just a recipe — they’re an experience. A reminder that the kitchen can be fun, messy, and a little magical, too.

Selena is an experienced lifestyle blogger and the voice behind many of Cozy Toned’s inspiring posts. With a passion for mindful living, home styling, and everyday wellness, she shares practical tips and fresh ideas to help readers live beautifully and intentionally.